
We can use Selenium Grid to execute our test parallely in multiple machines with different configurations.
Here we have used Port 5555 to start the hub.
We can see below message once this command is executed
Since we have used the local system as the hub, We can see the Selenium Grid console at http://localhost:5555/ once hub is started.
Grid console will be shown as below.

Here you can see we have used the hubConfig hub-conf.json along with the command. This config file will help us to configure the capabilities of the hub we are creating.
Sample hub-conf.json
If we want to run the same test parallely in all the node systems , we can keep this parameter as false.
We need to have the driver exe file and Selenium standalone server jar file in the node machine to run this command.
Once registered we can see below message in Hub.

The registered node can be viewed in hub console also.
 We have config file for node also, which helps us to set the configuration of the node system
Setup Selenium Grid
You can download Selenium standalone server jar file from below location.
We need to have this jar file in all the node machines in order to execute test in those systems.
Setting Hub for Selenium grid
Hub is the machine from which we trigger the test scripts. So we have setup the hub in the machine our project is in place.
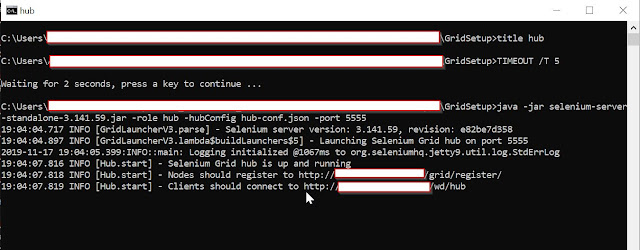
We can use below Command Prompt from C# code to start hub in local system.
java -jar selenium-server-standalone-3.141.59.jar -role hub -hubConfig hub-conf.json -port 5555
Here we have used Port 5555 to start the hub.
We can see below message once this command is executed

Since we have used the local system as the hub, We can see the Selenium Grid console at http://localhost:5555/ once hub is started.
Grid console will be shown as below.

Here you can see we have used the hubConfig hub-conf.json along with the command. This config file will help us to configure the capabilities of the hub we are creating.
Sample hub-conf.json
1 2 3 4 5 6 7 8 9 10 11 12 13 14 15 16 17 18 | { "port": 5555, "newSessionWaitTimeout": -1, "servlets": [], "withoutServlets": [], "custom": {}, "capabilityMatcher": "org.openqa.grid.internal.utils.DefaultCapabilityMatcher", "registry": "org.openqa.grid.internal.DefaultGridRegistry", "throwOnCapabilityNotPresent": true, "cleanUpCycle": 5000, "role": "hub", "debug": false, "browserTimeout": 120, "timeout": 45, "browserName": "chrome", "shardTestFiles": true, "maxInstances": 2 } |
Distributing test equally in all nodes available
We can decide if we want to run all the tests parallely in all nodes or to distribute the tests equally in all the nodes available. This can be done from the hub config.
If we set "shardTestFiles": true,
This will distribute the test equally and help us to complete the test execution faster.If we want to run the same test parallely in all the node systems , we can keep this parameter as false.
Setting up Nodes
Nodes are the machines where actual execution happens. we can register any number of nodes to the hub by running below command from the node machine.java -Dwebdriver.chrome.driver="<Path to driver file>\GRIDFILE\chromedriver.exe" -jar selenium-server-standalone-3.141.59.jar -role node -nodeConfig win-node-conf.json -hub http://<IP of Hub>:<PORT of hub>/grid/register/
We need to have the driver exe file and Selenium standalone server jar file in the node machine to run this command.
Once registered we can see below message in Hub.

The registered node can be viewed in hub console also.

Sample win-node-conf.json
1 2 3 4 5 6 7 8 9 10 11 12 13 14 15 16 17 18 19 20 21 22 23 24 25 26 27 28 29 30 31 32 33 34 35 36 37 | { "capabilities": [ { "browserName": "firefox", "marionette": true, "maxInstances": 5, "seleniumProtocol": "WebDriver" }, { "browserName": "chrome", "maxInstances": 5, "seleniumProtocol": "WebDriver" }, { "browserName": "internet explorer", "version": 11, "maxInstances": 5, "seleniumProtocol": "WebDriver" } ], "proxy": "org.openqa.grid.selenium.proxy.DefaultRemoteProxy", "maxSession": 3, "register": true, "registerCycle": 5000, "hub": "http://localhost:5555/", "id": "Windows-node", "nodeStatusCheckTimeout": 5000, "nodePolling": 5000, "role": "node", "unregisterIfStillDownAfter": 60000, "downPollingLimit": 2, "debug": false, "servlets" : [], "withoutServlets": [], "custom": {} } |
Starting Hub/Node from the C# code
We can start run the command to start the Hub/Nod from within the C# code using the process.Start
string strStartGrid;
strStartGrid = @"/c java -jar " + sSeleniumGridServerPath + "-role hub -hubConfig " + sHubConfig + " -port 5555 -timeout 3000 -browserTimeout 3600";
System.Diagnostics.Process.Start("CMD.exe", strStartGrid);

string strAddNode;
strAddNode = @"/c java -Dwebdriver.chrome.driver=" + sChromeDriverPath + " -jar " + sSeleniumGridServerPath + " -role node -nodeConfig " + sNodeConfig + " -hub http://localhost:5555/grid/register/";
System.Diagnostics.Process.Start("CMD.exe", strAddNode);
Kill/Stop registered selenium grid from a Port
We can go to below URL from any browser in hub system to kill/stop selenium grid in a port.
http://localhost:5555/grid/admin/LifecycleServlet?action=shutdown

No comments:
Post a Comment